Wednesday, October 27, 2010

Enjoy Your Day

Have you ever envisioned a card and had it turn out, right down to the details? This is the first card that has ever happened to me, and probably will be the last :) I have ideas that I play with, not pictures in my head. My Mom has an ability to do that, but I digress :)

I have been wanting this MFT "Can Ya Dig It?" stamp for ages and when I saw someone selling it on SCS, I jumped at the opportunity to get it.


I used some scrap pieces of My Mind's Eye paper that I had, but were too small to use on a card. I used my Tombows to color in a few pieces and the "dirt". The paper ribbon is from K&CO, the ghost flower shape is from Heidi Swapp, and the button was from Autumn Leaves. The word "Enjoy" is a rub-on from S.E.I "Mimosa".


I kept the inside simple with another rub-on from the Mimosa S.E.I package, along with the Open Scallop Die-Namic.

I challenged myself to use buttons and rub-ons on my card. Both of which I have plenty of, in my stash, but I NEVER use! So lets pull them out, dust them off and use them! :)

Monday, October 25, 2010

Bake Sale

So this Friday my oldest daughter has a Bake Sale Auction at school. Guess who volunteered to make cookies and help out? ME!! I love to bake and decided that I'm going to make my Double Down Double Chocolate Chunk Cookies with Maraschino Cherries and Pumpkin Spice Cookies with Caramel Frosting - YUM! So to add to the fun and stress, I decorated some of the bags, for the auction :)


This one is going to hold my Double Down Chocolate cookies. I made this with Halloween colors in mind, since the Carnival and Auction is going to be held on October 29th. I don't celebrate Halloween, so I don't have anything Halloween themed to add to my bag, but the colors :) I used my WTG "Lovin from the Oven" because doesn't it just say freshly baked?? :) I edged it off with my MFT Open Scalloped Die-Namic.

Of course this bag has to hold my Pumpkin Spice Cookies! I challenged myself to use only scrap pieces of paper, since I seem to be swimming in them, lately, with all my projects! I love, love the MFT PI "Lil Pumpkin"!!I used the MFT Open Scallop Die-Namic again, because it really makes a nice edge.

This last bag I decided to make a nice Christmas themed bag. I'm not sure if it will be appropriate since it's not even Thanksgiving, but I just Had to ink up my MFT PI "Sending You a Little Christmas", again! Isn't she darling? I love how this bag turned out! I used my Favorite MFT Gold ribbon - that stuff is PURE Luxury ribbon!!! Love that stuff! I wish I had bought more when it was on clearance!

I am hoping to knock out a few more bags for this thing but with the volunteering for the Book Sale, and Carnival, baking for the Bake Sale Auction at the Carnival (all of this being in one day), I think I'll be lucky if I can crank out another bag! But it's all for her school and I don't mind :)

Friday, October 22, 2010

So Sweet

I made this card after I played with a few ideas I had in my head. I wanted to use my Anna Griffin background stamp, that I just rediscovered! I have had that stamp for 4 years and have not ever used it until now!! *Gulp* Talk about wasteful! :( 


 I used my two of my Long Rectangle Spellbinder dies to make the shape of my card. I stamped the background in with my Anna Griffin stamp, with Versa Magic's "Pink Pixie" ink, and heat embossed it. The shapes are made with my Spellbinders Fleur de Lis Pendant die, Large Scalloped Circle die, and Circle dies. The sentiment is from the Flourishes "Berry Sweet" stamp set. Everything is popped up at different heights with popdots. 

I have been wanting to try to make my own background, and make a layered Spellbinder flower over it. I didn't quite get the flower I had planned in my head, but after playing around I came up with this card, made in pink, in honor of October being Breast Cancer Awareness month. I am currently working on a few cards to try to make for the SCS "Hope You Can Cling To" drive. You can find out more info on my blinky badge I have on my blog. 
Some of you may or may not know, my SIL passed away this January from Breast and Bone cancer after a 5 year long battle. This cause is near and dear to my heart, in honor of her and the many others who are fighting the good fight. I walked in the Revlon Run/Walk for Women, in May and had shirts made for my girls in honor of her, with the 2 Timothy 4:7 verse on it. It says:

2 Timothy 4:7
I have fought a good fight, I have finished my course, I have kept the faith.


It sums her up better then I ever could. She was given 6 months in the beginning but lived for 5 beautiful years. She was a fighter and had an encouraging smile for everyone. 
I'm praying for the cure!

Thursday, October 21, 2010

Life Without Love

Have you ever thought about life with out love? I hadn't until I saw the quote I used on my card. I would rather not think about what it would be like, knowing how much I love my my husband, family, friends and two girls!

Ok, this is my newest card submission for the Creative-Sketches Yahoo Group. They are a new group and I'm so excited! This week they have this Sketch and add a Dry Embossing technique Challenge to use on your card:


I decided to combine it with the Flourishes "Sentiments" challenge, too. I was going for a less shabby, but a more of a chic, kind of shabby chic :)


I used the Flourishes small apple from their "Apple of My Eye" set, colored in with my Tombows and Distress Inks. I tried to use a Crackle finish on the apples, but it didn't crackle at all...not even a ripple :( I decided to use them anyway, and added some popdots under the apples, to pop them up so they would show up better, behind the windows. ~ I'm CASing Stacy's (aka Twinshappy) double diecut window idea (Thank you, Stacy!!).
I first stamped my Hero Arts "Italian Poetry" on two cream cardstocks, for the backgrounds, in with "Tattered Rose" and "Victorian Velvet" Distress inks, then heat embossed it all. I dry embossed the top layer/background with a Cuttlebug leafy vine embossing folder, then used my Scalloped Square Nestie to cut my windows out. I used an EK Sucess punch to punch out a tiny open scallop border, on a piece of red CS, for a decorative edge. I used a French Script transparency behind the windows, then added popdots under it all, and placed the top piece over the bottom layer/background piece. I stamped the sentiment in "Victorian Velvet" from the Flourishes "Berry Sweet" set, on top of a Fancy Tag Nestie. I used Pins from Maya Road, placed under a Fleur de Lis Pendant from Spellbinders, and a Prima flower on top of some lace I found at a garage sale. I added a few pearls, then dry embossed a frame around the whole card, on my cream CS.


I love this card, but I think it looks too much like the last card I made, right down to the same stamp set used - LOL!! I Do LOVE my "Apple" set a lot! But I'm going to try to use a different stamp next time, and change it up to make my next card look different!
I do love both of my recent cards. I just like to try to make each card unique :)

Friday, October 15, 2010

Pink Apples

Yes, Pink Apples do exist :) They are called a "Pink Lady" and the flavor is wonderfully unexplainable. Some may say it tastes like an Ambrosia apple, but I think the closest analogy is eating a honey flavored apple - Yum! So that is my inspiration for this card. I'm going to send it to my Mom for her birthday. She actually loves green and I had a whole other card I made, but I'm going to send her a card with a pink apple instead, just to surprise her - LOL :)


I used "Apple of My Eye" set from Flourishes, and colored it in with my Tombows. I added a thin layer of Diamond Glaze, because I don't want flat looking apples :) I placed it on an oval and scalloped oval, cut out from Nesties. Using a sketch and a distress challenge from the Flourishes Blog, I distressed two of the edges and sponged everything down with "Tattered Rose" Distress Inks. Let me tell you, that edge Distressing was Stressing me out!! I thought it would be a snap, but it was harder to do then I remembered! I added pearls in place of what was supposed to be ribbons, and a Martha Stewart Butterfly (punch) where the bow would have been. Then before putting it all together I used my new Martha Stewart Scoring Board and double scored my cream CS base for some definition.

I cannot tell you the pressure to put this together before the Flourishes deadline expired! I had so many errands this morning! So when I got back I had 2 hours flat, and no wiggle room, to get this done and submit it! :) I had atleast 2 mistakes and 1 whole do over, before I finished it. Then I had exactly 2 minutes to take a pic, upload it to my laptop, use Photoscape to sharpen it all, and upload to SCS, then Flourishes, before I had to leave to pick up my daughter from school!! Talk about PRESSURE! My SCS pic is horrid, but Whew, I made it! :)
I hope it doesn't look like a card that I only had 2 hours to make - LOL :)

~ I should add that this is a picture that I retook, after dinner :) I couldn't stand the 3 second one, that I took earlier today! ;P

Tuesday, October 12, 2010

Sailing Away

I'm back! I'm sure you noticed that I took a bit of a hiatus, after the MFT GDT spot :) I enjoyed it so much that it was hard to come back down from being on cloud 9! But I'm back! :)

So I needed something to get my creative juices flowing, when I saw that Flourishes has a neat sketch challenge. I had missed so many of their wonderful challenges, in the past month, that I wanted to jump right in and this was the perfect time!

This is the card that I made from the challenging sketch.
(For some reason my blog is making my card all blurry. You can see it better if you click on the picture).


I used "A Guiding Light", "Antique Map" and the Happy Birthday stamp from "Sweet Violets". All are from the Flourishes company (love their stamps!). I used a long Rectangle Spellbinder to make the window cut out, and placed the lighthouse piece inside it. I then used my Tombows to color in everything, then added some Diamond Glaze to make the water more translucent instead of flat looking. I sponged some Antique Linen all over everything lightly, for an old patina look.

I needed a card for my younger brother's birthday today (Happy Birthday, Matt!!) and I love how it turned out! I struggle with "manly" cards, but this sketch really helped me think outside the box :)


Sorry for such a short post, tomorrow is my youngest's FIRST birthday and we are busy getting ready for it!!! :)

Wednesday, October 6, 2010

MFT Blog Hop & Shop Release Party!!

Welcome to the MFT Blog Hop & Shop Release Party!!  I hope you've been to the MFT Blog for a line up of all the MFT DT showing their best creations, tonight! Remember all of the great new releases are available at 10 PM EST. I'm so excited, are you?!

When I asked what I could show for the Hop & Shop, I was told that I could show whatever I wanted.  So I took that as a challenge - LOL  :) 

The idea of mixing the MFT PI sets has been rolling around, in my head, for a while now. It's just something I've always wanted to try and do :) So I played around and came up with this card.
I used the MFT PI "Something Special Just for You" and  PI "Lil Pumpkin" sets. Yes, that is the cute little PI that holds a Pumpkin, and she is surprising her other PI friend! I used Circle Spellbinder dies to make the polka dot frame around the girls and popped it up on popdots. The sentiment is stamped on vellum and framed in with a label from the Polka Dot Greetings set. The garland behind the girls is the swag, from the WTG "Winter in the City" set.

 Then I challenged myself even further, to try to use a stamp set in a way I would never think of using it. I chose the Game Day Duo set and made a Christmas ornament out of it.

 I stamped and embossed the Hearts, cut them out and placed them on pop dots all over the "frame" to make them stand out. I used the large Spellbinders Circle and Scalloped Circle to make the frame. Pearls were placed around it as a finishing touch. 

I hope you've enjoyed the Teasers and the Hop! I'm sad to not continue to be a MFT Guest Designer anymore, but I'm excited and thrilled to meet the next lucky winner! Good luck, to all who entered! :) Please don't forget to go shopping at MFT


I do want to quickly say that everyone at MFT has been nothing but kind and patient :) Thank you so much, Ladies! And thank you, too, for this Once-In-A-Lifetime opportunity! I enjoyed every minute :)
Thank you for visiting and all of your kind comments, and please feel free to stop by again :)

Tuesday, October 5, 2010

Who's That Girl and Snowflake Flopsy

Welcome back to Day Five of MFT Teasers and sadly my last day of being a Guest DTM :) But I had fun! Remember you can visit MFT blog at 11 EST and check out the list of all the DT's eye candy creations!! I know I will! Tonight come and join us for the Release Party starting at 8 PM EST, on the SCS MFT Forum! And please don't forget, after the Release Party, MFT is having a Blog Hop, starting at 10 PM EST.When these stamps will be available :)

Ok, I think Flopsy is a cutie! This stamp set makes me smile, and it's perfect for a quick Christmas card. So here's my simple card.
I love simple cards with clean lines, and that's what I wanted for Flopsy. I stamped and embossed Flopsy then used my craft knife to cut the image out.  For the snowball, I inked up the snowflake that comes with Flopsy, and heat embossed it. Then I tapped my glue ink pad all over it, and heat embossed again, so it would have a "texture" to it.

I'm sure you all know I love my WTG stamps, and this set is no different! Don't you just love the new WTG "Winter in the City" set? :)
For this card, I really wanted a "sepia" look, like a vintage photo has, to it.   


I decided not to color anything in, but the lamps, to keep with the clean sepia look. Spellbinders Fleur de Lis dies and some of their Labels line, made the perfect frame. It holds a flourished transparency, that represents the sweeping wind. I sponged it all off in creams and a very light brown. I apologize for the lighting, but I deliberately kept the light low and in a contrast, so you could see the transparency I used as the base of my card. It's written in French with all white ink, and it's hard to photograph, but I hope you can see the detail.


That's all I have for this morning, but I hope to see you this evening at the MFT Release Party and the Blog Hop & Shop!! I'll have two more creations to show you, and I'm So EXCITED I can hardly wait!!! :)


Monday, October 4, 2010

Inspired By - Caged Bird

Welcome to MFT Teaser Day Four. I'm enjoying all the DT's Teasers, aren't you? For more great cards featuring Teasers of these stamps, please go HERE, to MFT blog at 11 AM EST, and visit each DT members blogs. On OCT 6th there will be a MFT Release Party on SCS in their member forum, from 8 - 10 PM EST. Then, at 10 PM EST, MFT will be having a Blog Hop & Shop, when the stamps will be available for purchase. I hope to see you there :)

When I saw the Inspired By - Caged Bird stamps, I knew I wanted to make an untraditional holiday/birthday gift set, just for fun. I went with my take, on a holiday Grunge look, inspired by Tim Holtz. I made a container for the Gold Fish Crackers, and made a Soup sleeve and a Teabag holder, to complete the set.
Here is a close up of the Teabag holder book:
It opens up like a book and has two teabag slots inside. The Bird and the Diamond shape background is from the Inspired By set. The Bird was colored in with my Tombows, cut out and popped up.
Here is a close up of the Goldfish box and the soup sleeve (pardon the picture size).


I made a tag with the Polka Dot Greetings set (featured on Teasers Day One), stamped on vellum. The cut out Birds and Birdcage are from the Inspired By - Caged Bird set.  The small tag with the diamond and "Faith" on it is also stamped from the Inspired By set. The MFT Open Scallop Die at the top of the box was used to slip some scalloped edge papers in the "open/negative" slots that the die left behind, on my paper.


Please don't forget to join in all the fun on the MFT GDT Challenge, HERE. You could win over $100 worth of stamps and be the MFT Guest DT member for the month of November!

Thank you for stopping by, please come back tomorrow for more great ideas and Teasers!

Sunday, October 3, 2010

PI - Sending You a Little Christmas, Little Pumpkin, Snow Angel

Good Morning and welcome to MFT Teaser Day Three! The Teaser's are just flying by aren't they? Are you enjoying all the wonderful creations? For more, featuring these stamps, please go HERE to MFT blog, starting at 11 AM EST, and visit each DT Members blog. Would you like to know how to get these cute stamps? All of the stamps will be available for sale, on October 6th, after the Blog Hop and Release Party, at 10 PM EST! Please join us all on the SCS MFT Member Company thread while they release all their new Yummy stamps!

I have three cards to show you today, and the first one is PI "Sending You a Little Christmas".


I was not able to find my Christmas papers that I wanted to use for her coat, so I painted in little key areas to highlight them and give some interest. I used a deep, deep green card stock and ribbon to give my card a strong accent color and draw your eye to the little girl. The Open Scallop Die-Namic was used under the green ribbon for an accent piece.

My next card is showing PI "Little Pumpkin".

I love pumpkins and I love the MFT PI's, so when I saw this set I was crazy in love! I deliberately made everything green, because it enhances the bold orange pumpkin. I used K&Co and Graphic 45 papers for the two green backgrounds and a My Mind's Eye paper for the pumpkin. Then I went over the pumpkin with a Tombow to give shading to the deep grooves.

My last card is PI Snow Angel, isn't she cute?! Ok, time to put on our imagination hats for just a minute :) The idea behind this card, is that your looking through a window and watching her build a snowman.


I scored and folded cream CS so it pops out a 1/4 of an inch to create a shadowboxed window. I set the card at a slight angle to hopefully show the shadow box effect. The blue transparencies are from My Mind's Eye. They represent the frost on the window, and the wind swirling around outside. I used a Tombow to color in the hat, boots and mittens. I used some Spellbinders Squares, Fancy Tags, and a Big Scalloped Circle for the window cut out.

Please don't forget to join in all the fun on the MFT GDT Challenge, HERE. You could win over $100 worth of stamps and be next months MFT GDT Member!

That's all I have for today, but comeback again tomorrow and the MFT Designers and I will be showing some more fun sets that I'm sure you will enjoy!! :)

Saturday, October 2, 2010

Ballet Millie & Game Night Duo

Good morning! Isn't it a great day to check out Day Two of the MFT Teasers? I'm really enjoying all of the fresh ideas and stamp sets! Aren't the MFT Designers great? If you enter the MFT GDT Challenge HERE, you could win over $100 worth of stamps and be a Guest DT member, next month too! You can also see a list of all of the MFT DT Teasers HERE, at MFT blog starting at 11 AM EST. The stamps being featured, will be available for purchase at MFT, starting OCT 6th, after the Blog Hop and Release Party, at 10PM EST on SCS! Please come and join us, we'd love to see you!


For Ballet Millie, I thought she was so sweet and demure that I decided to keep her card very, very simple to let her shine.

I used the Scalloped and the Classic Spellbinders Squares to form a frame, and in the corners I used a Cuttlebug Swirl Bracket. Then I placed popdots underneath it, to bring out the frame, and make it look like she's on stage. I colored Millie in with my Tombow markers and kept it light an airy. Placing a light metallic Pink cardstock under her brought out the pink I had painted her Tutu in with.


For Game Night Duo, I went with a Halloween theme. Every fall our church holds a Game Night, on Halloween, for the families who want to come. So I made an "invite", just for fun, in honor of it.


I used the MFT Banner Die-Namic to make my banner, and the Open Scallop Die-Namic for a border. I stamped the images from the Game Night Duo set, and cut out the playing card symbols. The alphabet on the banner is the MFT Uppercase Wendy stamp set. I have never made a Halloween card, or used the colors before, and I love how it all looks :)


I'm glad you visited! Please come back again tomorrow for some more Fab MFT DT creations, HERE!! :)

Friday, October 1, 2010

Clearly Sentimental About Books & Polka Dot Greetings

Welcome to MFT Teaser Day One! MFT has all new stamps! Today's Teasers are Clearly Sentimental About Books and Polka Dot Greetings. These will be available for purchase, October 6th at 10 PM EST, after the MFT Blog Hop. If you want more information, please go to MFT Blog for a list of products and the list of MFT Design Team Members also showing these stamps, starting at 11 AM EST.
Are you enjoying all of the wonderful creations? I know I am! Today is my first Teaser post, as a MFT Guest Design Team Member, and I'm really excited! So let's get started then, shall we?

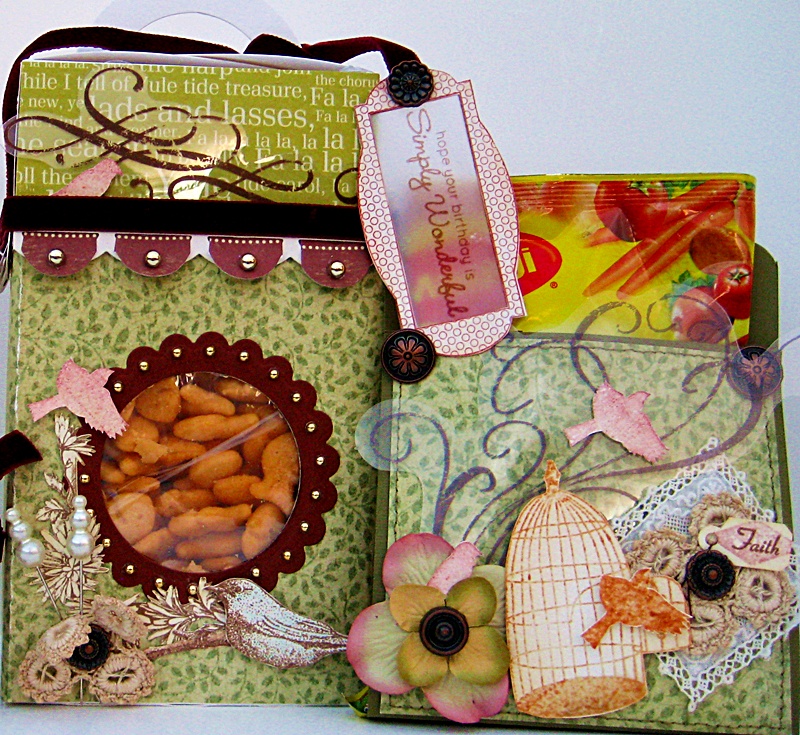
I am featuring MFT Polka Dot Greetings and the Clearly Sentimental About Books sets.With the Clearly Sentimental About Books stamps, I decided to use them to make a gift. I created a gift card holder, for the gift card to a bookstore, and then decorated a teabag to put in the gift cup.

I used a Fancy Label from Spellbinders to make the tab for the teabag, and the Big Scalloped Circle to cut out the window for the gift card holder. The metal piece, on the teabag, is a button that I cut the metal shanks off of.

Here is what the gift card holder looks like, out of the sleeve.

The back flap flips up to pull out the card, from a pocket, and the bird design is a rub-on.

Here is my card to go along with my Tea Gift set.

I used the MFT Polka Dot Greetings Friend and Label stamps as my main focus. The metal flowers are buttons too, that I cut the shanks off of. Spellbinders Label One, Fancy Tag, and Fleur de Lis Pendants were used with the MFT Open Scallop Die and the MFT Ivory Ribbon to add some pretty touches to it. I stamped and cut out around the polka dot label, and then cut out the middle, with my craft knife. I placed popdots under it, so the greeting looks like it is framed.

Please don't forget to play along with the MFT Guest DT Challenge HERE. You could win over $100 worth of stamps, and show your creations with the MFT DT, in November!

Thank you for stopping by and I'll be back tomorrow with more fun Teasers made with MFT stamps!